Candy Dish

Follow me here too!

Like what you see? Then follow me!

Wednesday, December 11, 2013

Create with TLC: "Oh Deer Winter is here" candle holders

Greetings!

Brrr...it is cold and it has been a while since my last post.  Life has taken over and mix in the holidays and I've been going non-stop.  One of the things that I have been doing is learning how to work with vinyl.  Oh boy, has it been a blast.  My project that I am sharing with you today is the results of my first try at working with vinyl. 

I used some awesome wordart from Create with TLC combined with some svg deer I found online and came up with some wonderful Christmas gifts for my friends.

Here's my project...
Oh Deer

Oh Deer Winter is Here candle holders


I used my Cameo to cut out the wordart from Create with TLC. I was really nervous, because it was my first time cutting vinyl and boy is this stuff expensive. I was very pleased to discover that it cut perfect on the first try and I love how the lettering turned out. I added some silhouettes of different deers that I had recieved with a svg packet. The glass jars came from the local Dollar store as well as the candles. After applying the vinyl, I sprayed some protective spray over the vinyl. It is made by Kryolan who makes several different paint products.
 
I will be linking these up to the Show It Off Sunday over at Create with TLC and these will end up as gifts for my friends.  I am now working on transferring pictures to tiles.  The possibilities are endless, but the time to accomplish it all isn't. *smile*
 
OH yeah!  Paulette has also been working with vinyl and wordart.  Check out this gorgeous canvas that she is giving away to one lucky winner here!  (fingers crossed it is me-lol) 
 
Thanks for looking and commenting!

Show it Off Sunday:  Oh Deer Candle Holders
 
Now get to creating...
 
 
Remember:  There are no mistakes in cardmaking, only opportunities for creativity!

Friday, November 8, 2013

Beccy's Place: Poinsettia Snowman

Greetings!

Woo-hoo it's finally Friday!  I couldn't believe it, when I woke up this morning there was snow on the ground.  Fluffy...white...snow!  I don't know why this is so surprising to me after living in Michigan all my life.  I think by noon it will all be gone.  Speaking of snow, I won this awesome snowman digi set from Beccy's Place challenge last month.  I love snowmen, but don't care to be outside in the cold and snow to make one.  :-) 

Beccy's Place Snowman set
 
Isn't this a fun set!  Great for all those Christmas cards.  She even includes sentiments, so no trying to come up with the right thing to say.  I love all of them, but the snowman looking up with the birdie on his nose is my fav.  However, I used the lovely Poinsettia snowman for my card below.


Poinsettia Snowman

Using a 6x6 red cardbase, layer on some bashful blue cardstock and dp.  The snowflake frame was designed by me using...yes my Cameo.  {Hi my name is Candy and I am addicted to my Cameo.}  The poinsettia was also created using the Cameo.  I used red cardstock and polka-dot dp for the flower and glitter cardstock for the leaf.  The snowman was colored using Copic markers and cut out using the Wonky rectangle diecut from Spellbinders.  The card was finished off with snow effects, glassy gel, Stickles, white gel pen and glitter gem beads.

You can pick this set up (or individual images) from Beccy's Place store and then link it up to her challenge

Thank you for looking and commenting!

Challenge(s):
Show it off Sunday (not a challenge but a showcase)
Beccy's Place Challenge

Now get to creating...

 
Remember:  There are no mistakes in cardmaking, only opportunities for creativity!

Wednesday, November 6, 2013

Create with TLC: Birds

Greetings!

Happy Wednesday to you.  I hope your week is moving productively along.  Mine has been very very busy.  I have been doing some late Spring cleaning only to discover that I am a paper hoarder.  I have a TON of paper and have been going through the stacks (literally stacks) to organize and take inventory of it all.  I am hoping to sell a lot of it, because it is overtaking my house.  I teach cardmaking classes so I would buy paper in bulk and I guess I didn't realize how much I have accumulated over the years.  Wowza!  I am checking in to using my Etsy store, but since it isn't "handmade" by me I wonder if I can sell it there.  Hmmm??  I will investigate.

In the meantime, I would like to share a card I made using a beautiful (in my humble opinion) image that I received from Create with TLC's Ocotber Club.  If you have never joined one of the clubs, you should because Paulette packs them with all kinds of awesome goodies.  She has a mini club going on right now.  Check it out here.

Here's my card using the beautiful birds...


Beautiful Birds

I kept this card really simple.  I layered on dp onto a 6x6 cardbase.  I used my MS lace punch to cut a strip and tucked that under a frame I created using my Cameo.  I mounted the image (pre-colored) on the frame and added Stickles to the tail to add some sparkle.  I finished the card off by added some pearls in the corner.  Very simple, but lovely I think.

I will link this up to this week's Show it off Sunday link over on the Create with TLC blog.  I would love to see your work there.

Thanks for looking and commenting.

Challenge(s):
The Paper Players:  Wildlife

Now get to creating...

 
Remember:  There are no mistakes in cardmaking, only opportunities in cardmaking.

Friday, November 1, 2013

Create with TLC: Falling Leaves

Greetings!

I hope your Friday is moving steadily.  The wind is howling and it's overcast here in Michigan.  I felt bad for all the little tricker-treaters yesterday because it was windy and rainy.  However, I doubt that it stopped the little ankle-biters from collecting their goodies. :-)

I am back to share another creation made using the Barely There promo set from Create with TLC.  I used the Falling Leaves image along with a sentiment from last year from Create with TLC.

Heres' my creation...

Falling Leaves
This card has a 6x6 cardstock base in eggshell white, layered with a burgundy textured cardstock and a 1/2 sheet of dp from SU.  The sentiment and image were matted on green cardstock, using Spellbinder's dies to cut the the shapes.  The image and sentiment were colored using Microsoft Word (you can see the tutorial in the lastest edition of the Through the Craftroom Door magazine).  The card was finished off with some raffata ribbon, glossy glaze and Stickles.

I will add this card to the Show it Off Sunday lineup over on the TLC blog.

Thank you for looking and commenting.

Now get to creating...

 
Remember:  There are no mistakes in cardmaking, only opportunities for creativity!


Thursday, October 31, 2013

Create with TLC: Autumn Splendor

Greetings!

Happy Thursday, last day of the month and Halloween (for those who celebrate)!  I don't celebrate Halloween; however, I do wear orange and black on this day, because it was my High School colors.  Go Chiefs! teehee

I am sharing a card I made today using a new freebie Barely There promo set from Create with TLC.  You will get this awesome set when you make a purchase in the store.  Paulette has so many wonderful sets at very affordable prices.


null
Barely There promo set

Here's my creation using the gorgeous acorns...

Autumn Splendor
Started with a 6x6 Kraft cardbase and layered on burgundy cardstock.  I rounded the corners at the top and used a Spellbinder's Diecut to cut out the center.  The image was colored using Microsoft Word (tutorial can be found in the latest issue of Through the Craftroom Door magazine) and glaze and Stickles was added to make it pop.  I used a Spellbinder's label diecut to mat my sentiment and finished the card off with white gel pen stitches.

Make sure you stop by the store, make a purchase and get this awesome set (6 images included) for free!

Thanks for looking and commenting.

Challenge(s):
Create with TLC:  Show it off Sunday

Now get to creating...

 
Remember:  There are no mistakes in cardmaking, only opportunities for creativity!

Friday, October 18, 2013

Create with TLC: Falling Leaves

Greetings!

Yep, Fall has definitely arrived (with Winter close behind) here in Michigan.  We had cold blowing rain yesterday and today is supposed to be dry, but it is still chilly.  I am determine not to turn on my furnance until I see the white stuff falling. lol  I have an old house with a fireplace so I try to use the fireplace, my little potbelly oven and blankets before I crank on the furnance.  Although, that usually doesn't last long because I am always cold. 

Today, I have a simple Fall/Autumn card to share with you using some goodies from Create with TLC last club (see the badge for the Christmas/Holiday club over there --------->).  Paulette packs these clubs with all kinds of fun finds!  You really can't beat the price and that reminds me I need to go sign up for the next one. 

Here's my creation...


Leaves are falling
I started with a 6x6 Kraft cardstock base, layered on some chocolate cardstock and some old dp from SU.  I digitally paper-pieced my leaves using my Cameo.  I aslo cut out a mat and my sentiment in the shape of a leaf on my Cameo.  The paper I used for my leaves, sentiment and leaf shape came from Create with TLC.  I finished my card off by putting glaze over the leaves to make them glisten.  I really kept this card fairly simple.  I love all the Fall colors and there are several places here in Michigan to go check out God's awesome artwork.

I will link this card up over at Create with TLC "Show it off Sunday."  I hope to see your creations there too!

Thanks for looking and commenting!

Challenge(s):
Create with TLC:  Show it off Sunday
Creative Knockouts:  Paperpiecing
Crafting with Dragonflies:  Nature/Leaves
Crafting by Designs:  Anything Goes
Belli Challenge:  Leaves
Divas by Design:  Autumn Colors
Inky Impressions:  Autumn/Fall
Penny's Challenges:  Anything Goes
The Sisterhood of Crafters:  Anything Goes

Now get to creating...
 
Remember:  There are no mistakes in cardmaking, only opportunities for creativity!

Thursday, October 17, 2013

Create with TLC: Christmas Cheer

Greetings!

Happy Thursday everyone!  I am popping in today with you to share some early Christmas Cheer courtesy of Create with TLC

I designed this card a little while ago and finally got around to finishing it.  This is truly the story of my life.  I couldn't decide how I wanted to finish it off until I came across this sentiment from Create with TLC.  I am going to add it to the Show it off Sunday showcase.  If you haven't posted anything over there yet, you should.  There is so much talent and inspiration.  Paulette is one smart (and generous) cookie for allowing us to strut our stuff on her blog.  You don't have to just submit a card nor do you have to use something from Create with TLC (although it would be truly appreciated if you did).  :-)

Here's my creation...

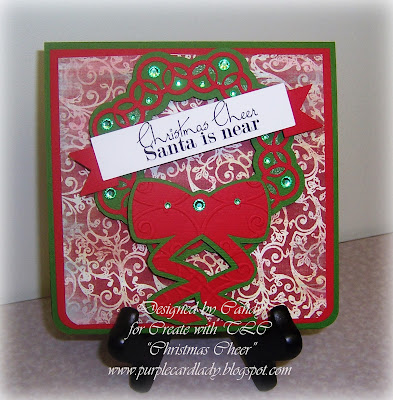
Christmas Cheer
I started my card with a 6x6 green Bazzill cardstock base, then red cardstock and finally dp.  I used my handy-dandy corner rounder on the edges.  I cut the wreath and bow out using my Cameo.  I embossed the bow and added green gems on it and the wreath.  I added a banner with the sentiment from Create with TLC.  This was a easy-peasy Christmas card. 

Again, you head over to Show if off Sunday and show off your creations!  I look forward to seeing them.

Thanks for looking and commenting!

Challenge(s):
Create with TLC: Show it off Sunday (not a challenge but a showcase)
Sisterhood of Crafters:  Anything Goes
Simon Says Stamp:  Christmas
The Paper Shelter:  Use two colors
Penny's Paper Crafty Blog:  Anything Goes

Now get to creating...
Remember:  There are no mistakes in cardmaking, only opportunities for creativity!

Wednesday, October 16, 2013

Create with TLC Dear Cookie...

Greetings!

I am back one more time to share with you a fun card I made using Create with TLC sentiment and Beccy's Place image.  I love cookies.  Oatmeal raisins is my all time favorite, but I don't turn my nose up at any of the others either.  I love to go to a place called Frankenmuth here in Michigan to get my oatmeal raisin cookies.  They are huge and yummy.  If I can't make it there, Panera's will do.  :-)  What's your favorite kind of cookie? 

In my creation below, I chose to make these cookies chocolate chip. 


Dear Cookies
I started out with a 6x6 Kraft card stock and I used my nifty corner rounder to round all the edges.  I layered on some dp, chocolate cardstock and more kraft cardstock, which I stitched down the side.  I then cut my image out using my Cameo, colored it (added chocolate chips) and finished it off with a glass glaze.  The sentiment, as I mentioned before, is from Create with TLC.  You can also see my card in the Show it off Sunday line up over on Create with TLC.  You should link your card up there too, it's like Pinterest that focuses on crafts only. :-)

Thanks for looking and commenting!
Challenge(s):
Beccy's Place:  Use a BP image
Create with TLC:  Show it Off Sunday
The Crafting Cafe:  Anything Goes


Now get to creating...

 
Remember:  There are no mistakes in cardmaking, only opportunities for creativity!

Happy Boss's Day Creations!

Greetings!

I am popping in today to share with you 3 cards that I made for my 3 bosses!  Yep, I have 3 of them. haha  Every since my very first job selling Circus Tickets (don't laugh), I have always had multiple bosses that I reported to.  I blame it on the fact that I am a Gemini, so I need at least 2 bosses.

Well, below are my creations...


Okay, the first two cards are pretty much the same with the exception of color and dp.  I used my Cameo to cut out the design and words for each card.  I used Bazzill and SU cardstock for the cards and finished them off with some pearl gems.

The last card or the "OZ-some Boss" card was a little more involved.  I started with 5.5 x 5.5 red Bazzill cardstock based and layered on the black diecut cardstock.  I used my Cameo to cut out a Silhouette of the Wizard of OZ characters, because my boss LOVES the Wizard of OZ.  Her office is decorated with memorabilia from the movie.  I used a yellow checkered dp underneathe the Happy and Day to mimic the yellow brick road.  I added Stickles to the Boss's cutout to mimic Dorothy's shoes.  I finished the card off with a yellow bow. 

The inside of the card reads...

Thank you...
 
for having a heart of filled with kindness,
for acknowledging that I have a brain,
for not making me take work home,
and for having the courage to stand up for me!
 
You are truly an "OZ"-some boss!
 
I had a blast making this card and she is so deserving of this and so much more.  Well, I hope that you have an "OZ"-some" day.
Thanks for looking and commenting!

Create with TLC:  Show it Off Sunday
 
Now get to creating...

Remember:  When you want to complain about your 1 boss, remember that I have 3!!


Friday, October 4, 2013

Heartfelt Creations: Butterfly Wings

Greetings!

Happy Finally Friday!  Wow, I hope your week has been a lot less dramatic compared to the week I have had.  I started out with a wonderful long walk on Saturday and ended up in pain from dehydration by the beginning of the week.  Ouch!  Drink lots and lots of fluid people daily!  Okay, enough of this on to some fun stuff.  Well, I have another project to share with you that I created for Heartfelt Creations DT call. 

Here's my creation...

Timeless Armour Die Butterfly
I used the Timeless Armour Die ( Decorative Lattice Swirl: 4" x 3") to create my butterfly.  I started with a 6x6 cardstock base and layered on a blue (love this color) cardstock from Bazzill.  I then layered on dp from HC Sunny Day paperpack.  I also used the Decorative Blossom Corner Die.  I finished the card with black gems and Stickles.

I am sharing this on " Show it Off Sunday" over on Create with TLC blog.  The second party will kick off tomorrow (Saturday) in honor of World Cardmaking Day!  I hope you will join us, because Paulette (as always) has an awesome prize to give-a-way!

Thanks for looking and commenting!

Challenge(s):
4 Krafty Girlz Challenge:  Anything Goes
MAWTT:  Anything Goes

Now get to creating...

 
Remember:  There are no mistakes in cardmaking, only opportunities for creativity!

Tuesday, October 1, 2013

Tumbling Calendar

Greetings!

Happy Tuesday everyone!  I am popping in to share with you a "tumbling" calendar that I created (and I didn't use my Cameo).  Several years ago my best friend purchased me a "tumbling" calendar (name I gave it) to sit on my desk at work.  I have taking it to every job or office that I worked in.  Well, recently there was a DT call for Heartfelt Creations and I thought I would make this calendar using their products.  I didn't get chosen for the DT which is fine, because I totally am inspired by the works of those talented ladies and will continue to be. 

Well, I decided to show off my calendar here and you can also see it on Create with TLC's "Sunday Showoff" over on the blog.  This is a new place that Paulette has created where you can strut your stuff (using TLC products or not).  To get all the deets on the rules, just click on the link above.

Okay, here's my tumbling calendar...


Tumbling Calendar

Sideview

Original

The reason why I call it a Tumbling Calendar is because you "tumble" the blocks (numbers and months) as the days and months changes.  I really enjoy my calendar and I love that it inspired me to create my very own version.  As stated before, I used Heartfelt Creations products - HCDP1 230 Sunny Day Paper Collection,HCD 728 Timeless Amour Die, HCD 729 Decorative Blossom Corner Die.  I also used some black stickers I had in my stash. 

Make sure that you head over to Create with TLC's Show it off Sunday and link your creation up!  You don't want to miss out on a party that is allowing your to strut your stuff your way! :-)

Thank you for looking and commenting!

Challenge(s):
All Crafts Challenge:  Anything but a card
My Craft Creations:  Anything Goes

Now get to creating...

Remember:  There are no mistakes in cardmaking, only opportunities for creativity! 

Friday, September 27, 2013

Create with TLC: Age doesn't matter...unless you are cheese (or wine)

Greetings!

Happy Friday!  It is gorgeous here today with the sun shining.  Too bad I have to be cooped up in an office. (Thank God for my job!) 

I don't have a lot to chat about today.  Just itching for the weekend to come.  I have so many projects and stuff I want to do.  So today I will just share another card that I made, but this time I used a rubber stamp instead of a digi.  I haven't whipped out my rubber stamps in a while.  My friend Michelle J. loves House Mouse stamps and she has probably all of them just about.  Well, this little guy was a perfect match to a sentiment from Create with TLC so I had to borrow him.

Here's my creation...

Age doesn't matter
I started with my usual 6x6 cardstock base and layered on some red dp.  I cut my image and sentiment out using Spellbinder's diecuts (Wonky rectangle and Labels 14).  I cut the Labels 14 in half so that I could stick the sentiment and mat out of the top of the birthday dp.  I colored my image using Copics and added some glassy gel pen over the cheese wrapper to give it a waxy look.  I love cheese and crackers.  It is truly one of my favorite snacks. :-)

Well, that is all for me today.  Have a safe and fun weekend!

Thanks for looking and commenting!

Challenge(s):
Ladybug Crafts Challenge:  Anything Goes
Seize the Birthday:  anythign Birthday theme with optional "toppings"

Now get to creating...

 
Remember:  There are no mistakes in cardmaking, only opportunities for creativity!

Thursday, September 26, 2013

Create with TLC: Friendship

Greetings!

Happy Thursday everyone!  What's your plans for the upcoming weekend?  I hope to do some crafting tomorrow night with my crafting buddies.  I have a few projects I would like to get checked off my list as "done!"  Saturday I hope to get up early and walk to my mom's house.  It is about a 6 mile walk so I am looking forward to it.  My fingers are crossed for dry sunny weather.  I don't need it to be warm (would prefer that it wasn't) because walking will keep me nice and toasty.  I love walking especially this time of year when God is changing out the landscape and added dashes of yummy jewel colors everywhere.  My tree is already losing her leaves.  Wowzer!

I am dropping in today to share a card I made using Sylvia Zet Wee stamp "Amy."  I had created a frame for my e-buddy Kim to use with a card she was making.  She wanted me to design her something that would work with a circle easel card.  You can check out the card and frame here on her blog.  (I will be selling this frame and many other soon. So keep a look out here for further details.  You can email me at cards by candy at yahoo dot com if you are intersted in me designing one for you.).  When I saw what image she was using I told her how much I really liked the image, but I didn't own any.  Well, I lied.  I didn't know they were called Wee stamps.  I saved the three that I have as Sylvia Zet stamps which are also called Wee stamps apparently.  Well long story that I am about to make very short, I used "Amy" to make my card.  I also designed another frame called "Friendship" to go along with this stamp.

Here's my creation...

Friendship
This card has multiple stories that led to its creation.  I just told you about the first one and now here's the second story, oddly enough involving Kim once again. lol  Kim proposed a challenge to me, (which she does often) to figure out how to use my Cameo to "cut out-of-the box."  We crafters do this often with our Nestabilities and scissors, but she wanted me to figure out how to make the machine do all the work.  I immediately took on the challenge and literally 15 minutes later, I had Ms. Amy cut out in a cirlce and her balloon sticking out of the circle.  I truly think God put her in my life to challenge me (in a good way).  Well done my friend! lol 

Okay, enough stories and now on to how I put this card together.  Well I started with 6x6 kraft card base, layered on some pink Bazzill cardstock and then MME Miss Caroline dp which I stitched on the sewing machine.  I then cut out the friendship frame and the sentiment mat using the pink cardstock.  I flipped the dp and used a strip to run across the center of my card with a Kraft mat.  I colored my image using Copics, Stickles and Copica pen.  I added some flowers from Wild Orchid and I could not complete this card without adding the perfect sentiment from Create with TLC

Moral of this blog post...don't be afraid to take on a challenge. :-)

You have for more days left before the next Create with TLC goodie club starts.  You don't want to miss out on this.  I already signed up.  Paulette is so very generous and it's like Christmas everyday when you get wordart, images, digi papers, colored images and more delivered right to your in-box.  Don't miss out!  Sign up today. 

Thanks for looking and commenting!

Challenge(s):
Crafter's Cafe Blog challenge:  Diecut ("friendship" frame)
Creative Moments:  Frame it ("friendship" frame)
Handmade Harbour:  Friend or family
Simon Says Blog Challenge:  Anything Goes
Wordart Wednesday Challenge:  Use encouraging or uplifting sentiment

Now get to creating...


Remember:  There are no mistakes in cardmaking, only opportunities for creativity!

Wednesday, September 25, 2013

Dear Coffee...

Greetings!

I hope your Wednesday (it is Wednesday right?) is going great!  I can't seem to keep track of the days lately.  I don't drink coffee, but maybe I need to start to wake me up.  lol

Anyways, I am sharing with you a card I made using a new wordart set from Create with TLC called "Dear Food."  As you can see, this is a really fun set.  You can pick this set up in the store today!

Dear Food
Here's my creation using the "Dear Coffee" sentiment...


I started with a 6x6 Kraft cardstock base and designed the sunburst using my Cameo.  I first cut out a mat with sky blue Bazzill cardstock then used dp to cut out the insert.  I used my Spellbinder's die to cut out a circle mat and my image and sentiment.  I wanted to keep it simple and I think I accomplished that goal. :-)

Thank you for looking and commenting!

Challenge(s):
Bearly Mine Challenges:  Anything Goes
Party Time Tuesday:  Anything Goes
Tuesday Throwdown:  Clean and Simple

Now get to creating...


Remember:  There are no mistakes in cardmaking, only opportunities for creativity!


Friday, September 20, 2013

Mo's DP2 Challenge: BEE You with flowers

Greetings!

Happy Friday!  So glad the weekend is here.  It has been a busy busy weekend.  I've been busy as a bee buzzing around doing this and that and now I want to get a manicure, eat lots of chocolate and catch up on my recorded shows. lol

I would like to share with you today a project that I made using Mo's image Bee.  I love this image.  I love bees (not real ones only artistically hand drawn bees).  I have had an idea similar to this one in my head for a while and decided to keep it there until this challenge came up.  I purchased Bee as soon as she came out a while ago and have kept her in a safe place until now. 

Here's my creation...

Bee You

Bee You 2
Okay, that cutie that is featured in the "Bee You" frame is my niece Yoni.  She would be so unhappy with her Tee-Tee if she knew I was featuring this picture (she was 5 in this picture and now is 13) on my blog.  Oh well, that is a Tee-Tee perogative to do so, right?! 

To make this project, purchase a $1.00 frame from Michaels and choose some dp.  I used Heartfelt Creations, Sunny Day Paper Collections.  This paper pack is literally packed with some gorgeous papers and this one was perfect for Bee and the theme of flowers.  Spray the frame with Scotch's adhesive spray glue and lay it face down on the back of the dp.  Use your scissors or exacto knife to trim away the excess paper and to cut the paper out of the middle section of the frame.  Using my Cameo, I cut out Bee and a mat using Bazzill cardstock.  The letters were also cut out on the Cameo as well as some extra flowers.  All images were colored using Copic markers and covered with glossy glaze, Modge Podge - glitter, matte and paper.

Thanks for looking and commenting!

Challenge(s): 
Mo's DP2 Challenge:  Say it with Flowers

Now get to creating...


Remember:  There are no mistakes in cardmaking, only opportunities for creativity!

Wednesday, September 18, 2013

Create with TLC: PRAY

Greetings!

Happy Wednesday to you!  I've been a busy little bee at work and in my craftroom.  I am taking a moment to share one of my creations with you today that is based off a sentiment from Create with TLC.  I am sure that you have heard or seen all the things that are going on in Syria, the shootings at the Naval base and the myriad of other tragic stories that are surfacing daily.  Well, I am a strong believer in the power of prayer.  I have seen what prayer can and has done for myself, loved ones, friends and strangers.  Prayer works, but like any tool you have to use it. 

Recently, I have been praying a lot more for various situations, indivduals and just talking to God in general.  I came across this wordart from Paulette and it pretty much summed up my feelings on prayer...I want the power to resound around me at all times.

Here's my creation...

PRAY
This card came together literally in pieces.  I started out finding this dp in my stash of scraps and thought I need to use this.  I set it aside on my craft table and later threw a piece of brown cardstock scrap next to it and then the pink cardstock.  I left it sitting for a few days and then was playing on my sewing machine and decided to stitch the pieces together to form the bottom piece.  I had more paper and cardstock leftover, added some reddish cardstock to the mix and stitched that together.  Next thing I knew I had this card.  I added some flourishes adn cut out scalloped circle mats and topped it off with this sentiment.  Very simple card with a powerful message. 

Check out the Create with TLC blog to find out the latest happenings (snag some freebies-leave some LOVE) and check out the store for this and so many other goodies.

Thanks for looking and commenting!

Now get to creating...


Remember:  There are no mistakes in cardmaking, only opportunities for creativity!

Thursday, September 12, 2013

I've got a "grape" Joke!

Greetings!

Wowzer it is Thursday already and I have another card to share with you.  I think my creative juices are flowing once again.  I love juice and my favorite happens to be grape juice.  I have to dilute it with water, but I do enjoy it over any other beverage.  I am sharing a card with you today I made for Doodle Pantry's Challenge.  I used the free bunches of grapes.  I have a purchased a bunch of images from Laurie, but I had these grapes and wanted to do something with them. 

Here's my creation...


Grape Joke
I started with a 6x6 white cardstock base and kept it very simple.  I took some scraps of purple and green cardstock and stichted them together.  I then used my Spellbinder's Wonky rectangle and oval dies to cut out my image, sentiment and mats.  I did not use my Cameo at all on this card. lol  I colored my grapes using Copic markers and used clear gel pens for accent.  The sentiment came from Create with TLC.

Thanks for looking and commenting!

Challenge(s):

Doodle Pantry Challenge:  Use a DP image

Now get to creating...


Remember:  There are no mistakes in cardmaking, only opportunities for creativity!

Wednesday, September 11, 2013

Beccy's Place Challenge

Greetings!

Happy Hump Day!  Now when I type that (or think about it), I think of that Gieco commercial with the camel.  I have seen several t-shirts on Pinterest with that on it.  Makes me laugh.  Yesterday was a scorcher for us Michiganders and today is supposed to be stormy.  Weather like this makes me want icecream, unfortunately, I can't have it anymore.  So, I decided to hop over to Beccy's Place and pick up icecream that I can have...a digi stamp.

Here's my creation...

Sweeter Icecream
Yummers!  I do love icecream and my favorite are lemon and caramel (not together).  I made a very simple card using this image, because the icecream should be the focus.  I used Kraft paper and layered on some polka dot dp paper.  I created some colorful banners and cut my images and sentiment out on my Cameo.  I matted them on a blue cardstock and colored my image using Copic markers.  I added some glitter using Copic Spica pens and add accents using gel pens.  I finished my card off using a sentiment from Create with TLC.

I will be enter my card in Beccy's Place Challenge for the month.

Thanks for looking and commenting!

Challenge(s):

Now get to creating...

 
Remember:  There are no mistakes in cardmaking, only opportunities for creativity!

Tuesday, September 10, 2013

TTCRD Challenge: Always Anything Goes!

Greetings!

The new Sizzling Summer issue of TTCRD magazine is out! Check out the video above. It is packed with all kinds of inspiring goodies and even freebies. You will also get to see the second in my 5 part "Getting Digi with TTCRD" tutorial on using digital stamps using a freebie from Create with TLC.


I hope your having a wonderful day! This week over at TTCRD we our honored to have Eureka Stamps as our sponsor this week. I used the beautiful the Pansies spray for my creation.

Here's my creation...

Thanks Enough
I used a 6x6 white cardbase for my card and layered on a green cardstock, dp and a strip of yellow cardstock.  I used a Heartfelt Creations die for the corner of my card.  I also used Spellbinder's circle and circle eyelet die for the sentiment which is courtesy of Create with TLC.  I colored my Pansie image using Copic markers and a clear gel pen.  I finished my card with pearl beads.

I hope that you will join us for this week's challenge. We would love to have you play along with us and it is always anything goes.

Thanks for looking and commenting!

Challenge(s):

Crafty Sentiments W, 1E, SIO - Anything Goes

Tuesday Throwdown W- #164 Anything Goes

Now get to creating...


Remember:  There are no mistakes in cardmaking, only opportunities for creativity!

Sunday, September 8, 2013

Mo's DP2 Challenge: Anything Goes!

Greetings!

Wow, it is already the beginning of another week.  Where did the weekend go?  I had a busy busy week.  My sister got married and I was writing a poem for the ceremony, finishing up programs, and sewing an aisle runner.  I can't believe how domesticated I have become lately.  In the past I only used my sewing machine for sewing on cards, but now I have been making wallets, aisle runners, purses and I've pinned a TON of other stuff I would like to make.  I am also cooking a lot more too.  I know this may not seem like a big deal, but for all my friends and family who know me, this is very different from my norm.  My mom says that I am just preparing for my husband. LOL...she cracks me up.

Anyways, I am entering another card in the DP2 challenge and have decided to use one of Mo's newer images for this card.  I fell in *heart* with the "Elke and Bear" image because of her face.  Mo has a way of capturing the innocence of a child's face like no other. 

Here's my creation...

Peachy Keen
 Okay, when I saw this image I didn't read Mo's description of it in the store and I just saw this beauty sitting on a swing under a peach tree.  Maybe it was because I just returned from the south and was craving some peach cobbler, who knows.  Well, I knew what I wanted to do with her and started with a 6x6 chocolate cardstock base.  I layered on a piece of embossed white cardstock and peach dp on the diagonal.  I cut out a tree, grass and fence on my Cameo and created my little scene.  I used Spellbinder's circle and cirlce eyelet dies to mat the image on.  I cut the little cutie out on my Cameo and used pop dots to adhere her.  I colored the scene using Copic markers. 

I finished my card off with a sentiment from Create with TLC.  If I said it before I'll say it again, Paulette always has the perfect sentiment for whatever I am working on. 

Thanks for looking and commenting.

Challenge(s): 
Mo's DP2 Challenge:  Anything Goes

Now get to creating...


Remember:  There are no mistakes in cardmaking, only opportunities for creativity!


Saturday, August 31, 2013

Mo's DP2 Challenge: Steffi's (End of Summer) Meltdown


Greetings!

Happy Saturday (of a long Holiday weekend)!  I can't believe that Summer is over soon.  Where did the time go?  Over at Mo's DP2 Challenge this week the theme is "Goodbye Summer" and I had a card in mind; however, when I scrolled through all my Mo images, Steffi spoke to me.  She totally summarizes how I feel about Summer ending way too soon.

Here's my creation...
Steffi's (end of) Summer Meltdown
As I stated above, I started out with a different image in mind totally.  However, when I saw poor little Steffi, we totally connected and I had to use her on this card.  She is truly devastated, as I am, that Summer just arrived and is now on it's way out.  I started out with a 4 x 12 piece of white Bazzill cardstock and layered on Kraft cardstock and pink and yellow cardstock.  I even threw in a bit of DP to tie all the colors together.  I stichted a couple of the background mats and then created a banner and flower using my Cameo.  I colored my sobbing cutie using Copics.  Lastly, I added a sentiment that pretty much sums up how I feel and Steffi agrees.

I have another project that I created that marks the end of Summer as well.  Those who know me, know that I LOVE to journal.  I have been journaling since I was a very very young.  I often go back years later and read my writings and have learned a lot about myself through my writings.  Well, this Summer I had a lot of happenings...took a long vacation, finally reached my weight loss goal of 100 pounds, found an exercise routine that works for me (and that I enjoy), etc. etc.  I had to capture all of this in a journal and decided to "design" my own journal rather than purchase one from the store.

Here's my journal...


2013 Summer Journal
                                        
I use another Mo image entitled "To the beach (aa)" for the cover of my book.  I started out covering a notebook I picked up from the dollar store with beach themed designer paper.  I matted my image to Kraft and White cardstock.  I used an ink pad to create some sand and sky.  I created a flower, heart, and banner using my Cameo.  The FAB wordart on the banner came from Create with TLC (thanks Paulette!).  I created the little Summer checklist to tie everything together and finished it off with some bling and ribbon on the edge. I colored my Beach Beauty using Copics and a gel pen.

Thanks for looking and commenting!
 
Challenge(s): 
Mo's DP2 Challenge:  Goodbye Summer!
Paper Crafting Journey:  Anything Goes

Now get to creating...

Remember:  There are no mistakes in cardmaking, only opportunities for creativity!

Sue Nelson and I

Sue Nelson and I
2009 Rubber Stamp Convention